

Hedge-coppicing
and Hedge-laying in the Bocage Virois
February 2011
M
ost of us are familiar with the age-old practice of 'coppicing' woodland, just as we are familiar with the usually separate but related practice of 'hedge-laying'.
In Normandy, coppicing hedges is common practice but the art of laying them has been lost. In England on the other hand, hedge-laying is widespread but the practice of coppicing hedges has been largely abandoned.
Centuries ago, hedges in both Normandy and England were coppiced and laid about every 10 to 15 years to provide renewable supplies of firewood and reliable stock-proof enclosures.
With the arrival of electric fences in the mid C20th, Norman farmers saw little use for a hedge except as a self-regenerating source of firewood and so they stopped laying them. The result is that Norman hedges are now usually unhealthy, thin and full of holes, seldom replanted and rarely capable of enclosing animals securely.
In England, the availability of cheap coal in the C19th made hedge-coppicing largely redundant. But English farmers were often still willing to lay their hedges: partly because they were more reliable than electric fences but mostly because they provided cover for wildlife and so improved the shooting.
At Le Bosquet in Normandy, we re-introduced the art of hedge-laying in 2001 and have been able to demonstrate that it greatly improves the harvest of firewood as well as the health of the hedge and the flora and fauna that depend upon hedges. Now, we hope, the English will re-learn the art of coppicing their generally well-maintained hedges!
This article describes the process involved in coppicing and laying a 15 metre length of hedge.
By Christopher Long
An Archaeological Study of Le Boquet
Agricultural Architecture in the Bocage Virois
1. Assess Your Hedge
I
t's January or February and a countryman's fancy lightly turns to... hedges. And his first step involves assessing his hedge, which is the least exhausting part of the job.
A typical hedge will contain a variety of trees, only some of which are suitable for coppicing (e.g. hazel, sweet-chestnut, hornbeam, ash, alder, birch and willow).
Try to identify the various species so that you know what you've got. Some species can be cut as 'coppice' and will rapidly re-grow. Others need to be left to develop into mature trees. And inevitably there are 'weeds' such as ivy or brambles which have their place somewhere but not in your hedge.
This stretch of hedge (above right) has probably not been touched for 20 years. Because it has not been coppiced or laid for so long, it grows very lethargically. It consists (left to right) of hazel, blackthorn, some stunted beech, an ash tree (which had its head chopped off by contractors laying electric cables overhead), hawthorn and several stands of hazel. This hedge has already been cleared of brambles. The ash tree is not ready for coppicing but the hazel and thorn could be laid to fill the gaps. Ideally the gaps should also be planted with a selection of coppice-woods (e.g. chestnut and willow) and the earth bank (known in Normandy as a talu and familiar to the English as a Devon bank) needs restoration.
If you simply cut the top off an oak or a beech, it will probably die. But if you do the same thing to coppice-wood – especially if you cut it off close to the ground – new shoots will immediately start re-growing vigourously from what is sometimes called its 'stool' but which ordinary mortals call the stump.
Over about 10 years these young shoots will have grown into saplings and then into 'poles' (when they reach about about 10 cms in diameter at their thickest point) suitable for a wood-burning stove and thus ready for cutting.
Many coppicable woods such as ash and hazel grow about 1 cm per year in diameter at their thickest point.
In Normandy some hardwood trees such as oaks are allowed to grow to maturity but from time to time their branches are pollarded for firewood. New branches then develop from the pollarded 'head' – known in French as a 'têtard'. This high altitude coppicing requires that at least one vertical branch (a 'tire-sève') is left in place in order to draw the sap up through the tree to keep it alive until new growth can sustain it.
A coppiced hedge is just a long and thin version of a coppiced wood. In a coppiced wood you selectively cut only mature timber from coppice species such as ash, hazel and chestnut which naturally regrow from the cut stump. When coppicing a wood or a hedge, you cut only a small sustainable proportion of the timber each year, which provides immature growth with additional space and light to grow on for selective cropping in later years. In this way a coppiced hedge is kept young, vigorous and productive while still performing its function as a barrier. In England, coppiced woods are relatively common and hedge-laying is widespread, but coppiced hedges are almost unknown. Here in Normandy the art of laying hedges and replanting them has been lost but some coppiced hedges survive, although sadly Norman hedges are increasingly processed 'all-in-one-go' along their length, as in England, and bonfires are needed to burn great piles of immature and wasted young growth!
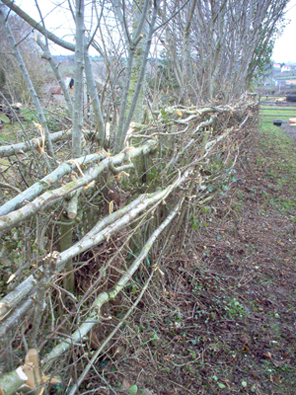
 This 15-metre length of hedge has been coppiced lightly and then laid with four or five 'layers' of folded saplings. It can be selectively coppiced in years to come and the 'laying' process will provoke a profusion of young shoots next Spring which will be ready for harvesting as poles in about 10-15 years' time – (click to view larger).
Before tackling the 15 metre length of hedge shown in the picture above, I found a young ash at the extreme left, followed by two stands of hazel, followed by some hawthorn, an older ash, more hawthorn, a run of several stands of hazel, a young holly tree which was being smothered by neighbouring hazel, and finally two more young ash trees. Bearing in mind what is native to our land – and that the hedge needs to be stock-proof – it would be a good idea to plant some blackthorn in the gaps. The overall health of the hedge was clearly going to be greatly improved by some light coppicing and some serious hedge-laying. The coppicing meant that I simply harvested the largest poles and left the rest. The laid hedge should be good for at least 20 years though I might do some minor repairs when we do more coppicing in about five years time. So, my assessment of this hedge before I started work was:
The principal behind coppicing is that when you cut certain species off near their base, nature responds by producing several young, vigourous shoots as replacements and each of these shoots will make a coppicable 'pole' in about 10 years' time... it's a sustainable method of inducing nature to double or triple the plant's reproductive vigour.
- I ought to coppice the biggest of the hazel poles for firewood (i.e. those more than 10 cms in diameter at their thickest point)
- I could lay about 20 of the hazel saplings and some of the hawthorn to re-make my hedge
- I should be able to leave about four-fifths of the hazel and hawthorn to grow into poles ready for coppicing in about five years' time
- The four ash trees are still immature and will be ready for coppicing at about hedge-top level in about 10 years' time, but I really ought to plant some blackthorn in the gaps this year.
- The holly is not a candidate for hedge-coppicing (though it can be laid as hedge) and so it will be left to grow into a large tree.
2. Tools
You don't need much!
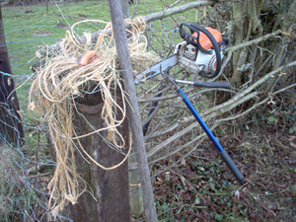
- A chain saw – but a sharp curved pruning-saw capable of cutting poles 4-10 cms thick is just as good
- A pair of long-handled shears capable of cutting through branches up to about 3 cms thick
- A sharp hatchet with a small enough head that you can manoeuvre it easily among tangled branches
- A sharp pocket-knife
- Some sort of pole (2-3 metres long) with a hooked end for catching and bending down the saplings you will be laying
- A good supply of bio-degradable string (old-fashioned sisal baler-twine is perfect)
- A pair of thorn-proof gloves (especially important if your hedge contains blackthorn)
- If your hedge has large gaps, a few stakes could be useful (ideally chestnut, about 130 cms long and 5 cms thick)
3. Cleaning The Hedge
 This is straightforward. You simply need to remove any obviously dead wood, ivy, bracken, etc., so that you can clearly see into the structure of your hedge from ground level upwards.
Be sure to remove any brambles, especially if they've grown up into the canopy of the trees. You will find it almost impossible to manipulate the saplings if they have brambles in them.
If not kept under control brambles alone can ruin a hedge in three or four years. Cut each bramble stem off at ground level and then pull it out in one piece.
It's easy to spot brambles in winter: they tend to keep many of their old green leaves which are clearly visible among the bare branches of hazel, ash, etc. Brambles do of course have their own valuable place in hedgerows, but only provided that they do not to climb into the tops of trees and suffocate them!
 This picture (above right) shows an old, tired and neglected hedge in which brambles have stifled new growth and over-mature ash trees have prevented light reaching the 'hedge' below. In addition, ivy is now stifling the ash trees – the presence of ivy like this being a sure sign of unhealthy trees and an unhealthy hedge. Worst of all, cows, sheep or horses would easily pass through the gaps and holes. Cleaning, coppicing and laying will quickly turn this into a useful and productive hedge. Remember that healthy hedges need light and, in the battle of the hedgerow, "he who climbs highest lasts longest".
The same hedge (pictured right) after it has been cleaned, stripped of brambles and ivy, coppiced and then laid. Some of the largest ash boughs will probably be coppiced next year. The ivy has been cut through at ground level and although the remains are still visible higher up in the ash trees, it will soon die off. The laid hedges are already perfectly stock-proof but could benefit from more attention in a year or two when there are new young saplings to be incorporated into the lower levels of the hedge.
4. Hedge-coppicing
 Now is the time to harvest any timber which is ready for coppicing. In the case of hazel, for example, anything more than 7-10 cms in diameter at its thickest point is ready for harvesting.
In woodland coppicing you would cut them off at the 'stump'. But if it's important that your hedge remain a stock-proof barrier, be sure to cut this timber about 100 cms from the ground, leaving a barricade of stumps.
Some of these stumps may die but they provide support and structure while new shoots establish themselves.
Try to cut the stumps on a slant so that rainwater runs off, reducing the risk of rot. You will find it far easier to saw through this sort of thickness with a chain-saw!
This stand of hazel is mostly about 10-15 cms in diameter at its thickest point and ready for coppicing. It is thicker still at the base but it forms the end of a hedge that needs to be stock-proof and needs stumps 100 cms high for rigidity.


 It also helps if you are systematic about the coppicing process.
As you cut through your 10 cms poles, drag them out of the hedge and lay them in a line parallel with the hedge but at least four or five metres away (to leave a working passage along the hedge-line) with all their heads pointing in towards the hedge.
In the picture on the right, when 'processing' the poles cut from the hedge, they are roughly divided into thinner ones for 'kindling' and thicker ones for 'logs'. A working passage of about five metres was left between the hedge and the timber to be 'processed'. Our rule of thumb is: if you can cut them with the shears they're kindling. If the resulting timber is neatly piled up with two ropes running transversally underneath them it's easy to lift the entire stack in one go with the forks or a tractor. The picture on the left shows the sorting process: brushwood for burning (if it can't be used more productively!), kindling and logs...
Now it's easy to trim off the heads and side branches with a pair of shears leaving the bare poles ready for cutting into fire-wood when they've had a year or two to dry.
To be really efficient, lay two strong ropes parallel to each other, about two metres apart, and lay all your poles across the middle of them. Gather the four ends together and the forks of a tractor will be able to lift away a large pile in one go.
In Normandy the feathery 'heads' and side branches were traditionally bundled into fagots which were stored and dried before being used to heat bread ovens. The same material was called 'brushwood' in England because you could make brushes with it. Similarly you could make a broom from 'broom' (plante à genêts = plantagenet = the yellow-flowering broom plant which gave its name to a dynasty of English kings).
The word 'fagot' existed in English too, but later came to mean something that was fairly valueless and ultimately became a disparaging term for a homosexual. However, fagots were still being made at Le Bosquet in the C21st!
5. Laying a Layered Hedge
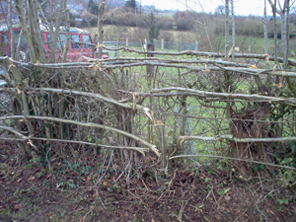 After coppicing-out the larger timber, you should now be left with timber you're planning to keep permanently as well as a clean line of younger wood up to about 7 cms thick. Some of this young wood will be used for laying the hedge but the rest will be coppicable in the future.
Assuming that you want your hedge to be stock-proof (sheep, cattle, horses, etc.), it would best to plan on a 'stockade' four levels high. As you can see from the pictures, you will be cutting half-way through selected boughs so that they can be bent almost horizontally in four layers about 25 cms apart.
 It's important to plan and select carefully which boughs will be most suitable. You will probably find that there is a shortage of suitable candidates for the lowest level (25 cms from the ground). If you tie a piece of string around the ones you've marked out for 'laying' you will be less likely to cut them down by mistake.
Remember the golden rules of 'layering' a laid hedge:
- Work from the bottom upwards. Lay the saplings that form the lowest layer first. If you don't believe me, try working from the top down and see how far you get!
- The sap will need to 'rise' if your hedge is to remain alive. Make sure each of your cut-and-bent 'horizontal' saplings is rising slightly towards the tip.
- Work in the right direction. If you are laying the saplings with their heads bent towards the left, work from left to right (and vice versa). If you are laying a hedge up a slope, the heads will need to point up the hill and you should therefore work from the top of the slope back towards the bottom. If you work in the wrong direction saplings you want to lay next will be trapped behind saplings you have only just laid.
- Be brutal. The reason for cutting savagely into the wood is that nature responds to these wounds in the same way as she responds to coppicing – a profusion of new growth will appear in the form of a wall of vertical shoots.
 Take your time planning which saplings you will use. A long pole with a hook on the end will allow you to catch and bend them down into place. There should then be enough tension in the area of the bend that a single sharp blow with a small hatchet will make the necessary fracture. Another way to do this is to half saw through the sapling before you bend and pull it into position.
Make sure the laid sapling rises very slightly towards its tip and then fix it firmly in place, locking it in among other timber in the hedge and tying it into place with bio-degradable string such as old-fashioned sisal baler-twine. By the time this string rots the sapling will have become a solid and integral part of the hedge.
Some hedgers advise attaching the laid saplings to chestnut stakes hammered into the ground. This is advisable where there are long gaps in the hedge but, where possible, it is better to use the living, one-metre high stumps that are left from the coppicing process (see picture right).
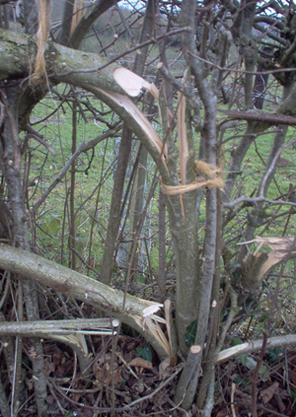 The principal behind layering a 'laid' hedge is that when you 'wound' certain species, nature responds by exaggerated regeneration.
If a sapling is both wounded and then bent horizontally, the regeneration takes the form of dozens of fast-growing vertical shoots.
If this regeneration also occurs on three or four different levels – or layers – the profusion of new growth produces a dense and impenetrable barrier, which will provide a rich source of timber over a cycle of about 10 years – as well as greatly improving the environment for birds and mammals of all kinds.
Like coppicing, 'laying' and 'layering' hedges is another sustainable method of inducing nature to double or triple the plant's reproductive vigour – to the advantage of the plant, of wildlife generally and of mankind!
Re-planting
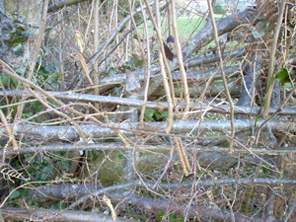
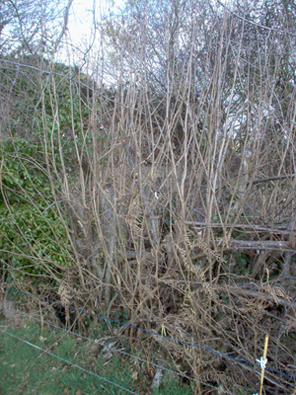 January and February are the ideal planting months and you should consider having a stock of young trees on hand as you work along your hedge. The advantage of this is that the young trees, perhaps 100-150 cms tall, can be built into the hedge, protected by the layers.
The trick is to imagine these trees as they will be in 10, 20 or 50 years time and plant them far enough apart that their canopies will not interfere with each other. If you plant oaks, for example, you won't see them mature in your life-time, but your great grandchildren might. But during this time three or four generations of ash could be coppiced from the spaces between the oaks.
If your young trees are likely to be attacked by rabbits (who adore young ash bark, for example), consider protecting them to at least 30 cms from the ground. Plastic agricultural drainage piping works well (often sold in 50 metre rolls). It may be coloured bright yellow or red but at least you can see where your young trees are. The protection can probably be removed after five years or so.
Bearing in mind the wide differences in soil quality and acidity, be guided by what naturally does well in your neighbourhood. Try for variety but avoid including exotic, non-native species in your hedge as they can play havoc among indigenous flora and fauna (particularly insect life). And try to cater to the needs of particular species: ash needs unimpeded light throughout the day; willows prefers damp soil but are extremely easy to plant: just stick a willow shoot in the ground and it will probably grow. And so on...!
Case Studies
(click on images to see them larger)




A = This shameful sight is a very typical Norman 'hedge'. It had not been tended, re-planted or cared for in way in the previous 60 years. Successive farmers had simply taken wood from it where they could and relied on electric fences to keep their animals enclosed. Here we've cut it back to one metre high to encourage young saplings to grow from the base, middle and top of the stumps which, in two or three years' time, can be laid to cross the gaps. We've left a tall sapling about every 30 metres to provide staging posts for smaller birds and hunting perches for hawks. Next year we will replant in the gaps using fast-growing hazel, willow and ash for quick results.
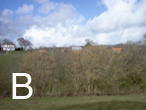
B = This hedge is now ready for coppicing. It was coppiced lightly (and laid) about seven years ago. This stretch of hedge produces innumerable young elm trees which grow to about 5 metres high and are then sadly killed by the insect that spreads Dutch Elm Disease. This explains the holes in this hedge. We deliberately leave most of the dead elm trunks in place to provide insect food for birds. We find that elm can be 'laid' into the hedges and so avoid the disease. Of course this will not produce splendid elm trees in the future but it does keep the species alive and present.
C = Compare this hedge with 'D". These are in fact two ends of the same hedge but this end was never laid. It contains large ash trees ready for cutting but the hedge coppice is pathetic, simply because it has not been coppiced or laid in the past.
D = A hedge that was partially laid, two layers high, about eight years ago and will be ready for coppicing in about three years' time. It has been kept clean of brambles and is among the best-looking hedges anywhere in the region! Compare it with 'C' which is the other end of the same hedge.
E = This tangled nightmare shows what brambles can do. In fact there's scarcely any other hedgerow species visible because the brambles have filled a hole and prevented anything else from growing there.
F = The large wild cherry tree is being steadily smothered by ivy. While certain species of birds depend on ivy-clad trees like this, drastic action needs to be taken. This requires cutting through the 'trunk' of the ivy in two places about 10 cms apart and removing the section. Ivy very often attacks trees that have been damaged or scarred. The mangling effects of agricultural hedge cutters are responsible for a great deal of damage, as was the case with this cherry.


© (2012) Christopher A. Long. Copyright, Syndication & All Rights Reserved Worldwide.
The text and graphical content of this and linked documents are the copyright of their author and or creator and site designer, Christopher Long, unless otherwise stated.
No publication, reproduction or exploitation of this material may be made in any form prior to clear written agreement of terms with the author or his agents.


Ash
die-back


October 2012
In 2012 the presence of a serious disease threatening Europe's population of Ash trees became widely known.
This disease was thought to have been first observed in the USA about 30 years earlier and to have steadily spread through the Far East and into Poland and Eastern Europe by the early years of the C21st.
By 2011 Denmark was reporting that about 90 per cent of its Ash trees were terminally affected by this disease. Spores from a fungus seem to be spread by wind and by water. In 2012 serious effects were being monitored in eastern England and eastern and northern France. The author saw numerous examples of well-advanced ash 'die-back' in a car park at the Pointe du Hoc on the northern coast of Basse-Normandie in October 2012.
The effects in Western Europe are likely to parallel those of Dutch Elm disease in the 1970s although the transmission mechanism is entirely different.
We are all advised to keep as well-informed as possible on the current state of scientific knowledge and any suggested advice on the source of resistant strains.
We are also being asked to act proactively by careful planting of standard specimens as well as hedgerows with alternative native woodland species (locally sourced) which will help to fill the gaps left by inevitable loss of the vast majority of our current ash population.
According to Wikipedia: "Hymenoscyphus pseudoalbidus is an Ascomycete fungus that causes ash dieback, a chronic fungal disease of ash trees in Europe characterised by leaf loss and crown dieback in infected trees. The fungus was first scientifically described in 2006 under the name Chalara fraxinea. Four years later it was discovered that Chalara fraxinea was only the asexual (anamorphic) stage of a fungus that was subsequently named Hymenoscyphus pseudoalbidus. Trees now believed to have been infected with this pathogen were reported dying in Poland in 1992. Poland is the country in which ash dieback is believed to have originated. It is now entrenched in Europe. It is closely related to a native fungus Hymenoscyphus albidus, which is saprotrophic and grows on the dead leaves of ash trees."
[Pictures in this section are "Courtesy The Food and Environment Research Agency (Fera), Crown Copyright"]
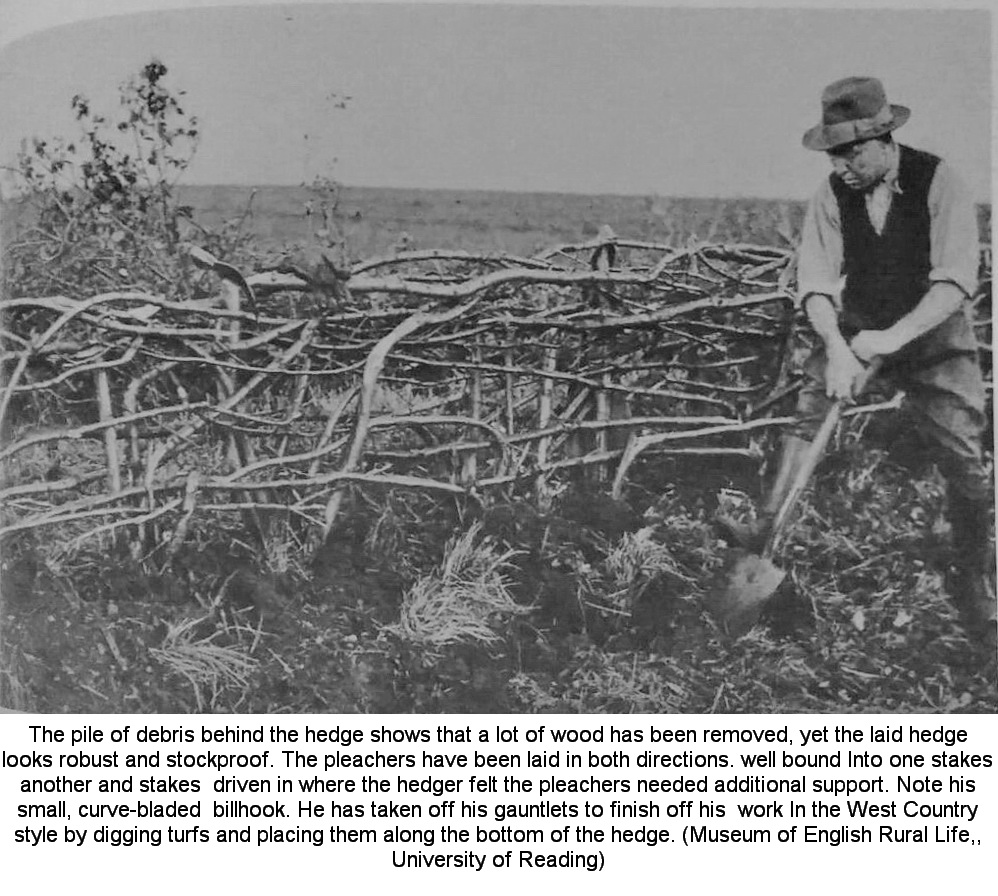
Hedge-laying studies by Georg Mueller
December 2016
I'm most grateful to Georg Mueller for his interest in our hedging practices in England and Normandy. Georg is the expert in this field and has made exhaustive studies of the ways in which European hedges are managed and laid. To begin with, in 2016, he was surprised to see that I was using a form of hedge-laying that did not seem to him to have its roots in British hedging practice. I assured him that what I was doing in Normandy was based on what I had seen done in Kent, England, when I was a child in the 1950s. Then, a month or two later, Georg kindly sent me the photo (at the head of this item) which shows almost perfectly what I remembered from my childhood. The only difference is that, as I remember it, all the saplings were laid in the same direction and that, when a hedge climbed a slope, the angle of the cut-and-bent saplings climbed upwards too. Georg describes the work in the photograph as: 'A step hedge folded to an angle of 90° in six steps (cf. fig. 427)'. My work he describes as: 'A folded step hedge, folded to an angle of 90° five times with living posts (cf. figs. 412-413)'. Georg's study into hedging practice Europe's Field Boundaries (2013 Georg Mueller) is strongly recommended and and I'm most grateful to him for his work.
Lieber Christopher,
Das Photo von Murray zeigt einen Heckenstil den ich in meinem Buch als 'Step hedge folded to an angle of 90° in six steps (cf. fig. 427)' beschrieben und abgebildet habe. Den Stil den Du anfertigst und auf Deiner Seite beschreibst habe ich in meinem Buch als 'Folded step hedge, folded to an angle of 90° five times with living posts (cf. figs. 412-413)' abgebildet und beschrieben. Damit haben wir bereits jetzt schon zwei neue nachgewiesene Heckenstile für Großbritannien.
In Frankreich wird der Stil 'Step hedge folded to an angle of 90° in six steps' immer noch ausgefährt und wird von mir zusätzlich als Branche bezeichnet. Er wurde von mir nach der Region benannt in dem er heute noch vorhanden ist.
Es wäre sehr nett von Dir, wenn Du den Titel meines Buches mit in Deiner Beschreibung aufnehmen könntest. 'Europe's Field Boundaries' (2013 Georg Mueller). Anbei sende ich Dir noch zwei Rezensionen zu meinem Buch und ein Foto von den Büchern.
Herzliche Grüße Georg

What's
that
tree ?
April 2013
Trees are most easily recognised by their leaves, flowers and fruit. But as this is only possible for about half the year, another useful way to distinguish between species is to study their bark and their cross-section.
When the Musée du Bocage at the Bois Jugan in St Lô, Normandy, mounted an exhibition on 'wood' (in all its forms), it provided hundreds of cross-section slices of a variety of common trees which allowed visiting children to keep a sample of their favorite tree on a string around their necks.
For this enlightened idea we have to thank the museum's inspired and inspiring director, Françoise Herman, who retired from her post in 2013 and will be much missed.
Willow
logs
May 2013
This is an experiment...
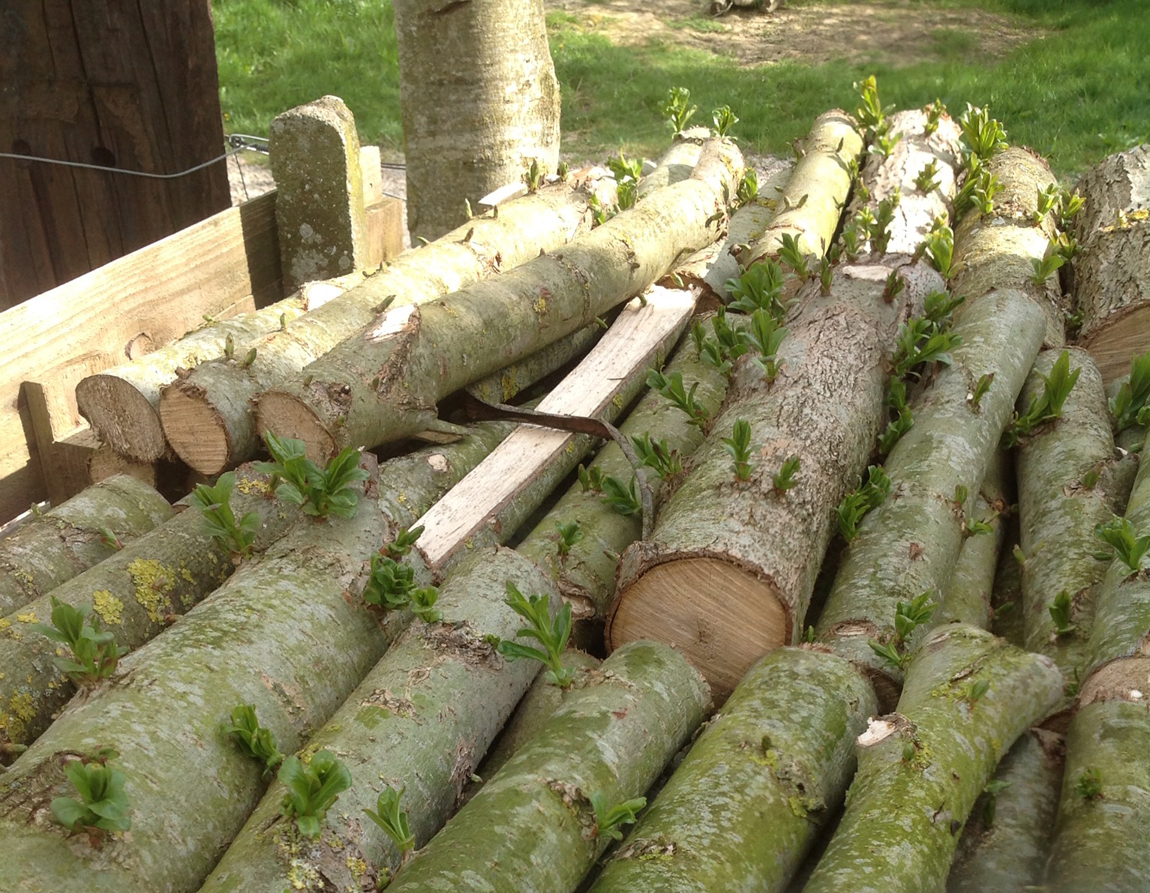
During the winter some friends coppiced some old willow trees in a hedgerow and kindly offered us the harvest: about a cubic metre of firewood. We stacked the logs and planned to burn them as soon as they were dry because willow is a fairly poor firewood which doesn't keep well.
In April we found the logs sprouting, as is often the case with coppice woods which are cut when the sap has started rising.
Rather than burn them, we've decided to see whether they can be used to create a new hedge. We've left a number of them floating in a pond, hoping that roots will develop below the waterline and that the sprouts continue to develop above...
If roots and sprouts do well we'll plant the logs in a line and see what happens.
